Hole by Hole

A guide to all 18 holes

Hole 1 Monument

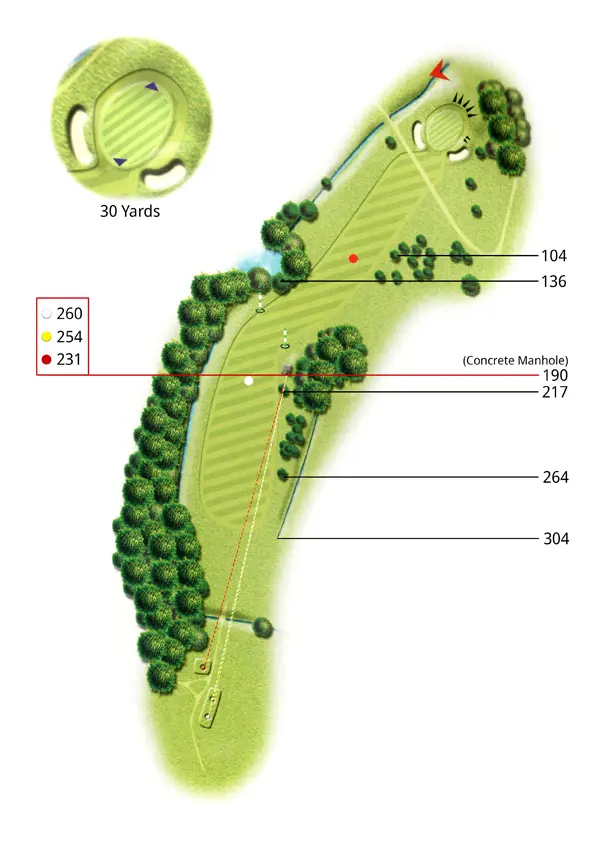
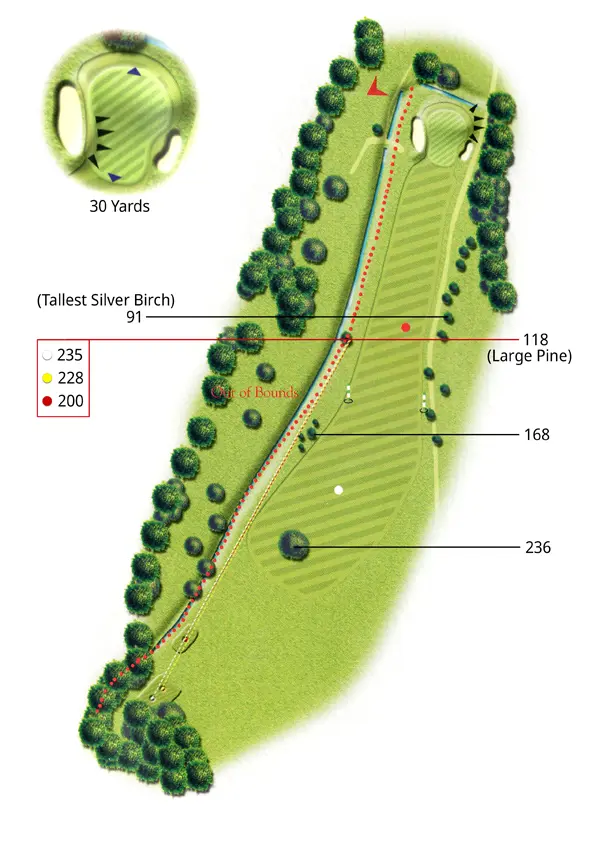
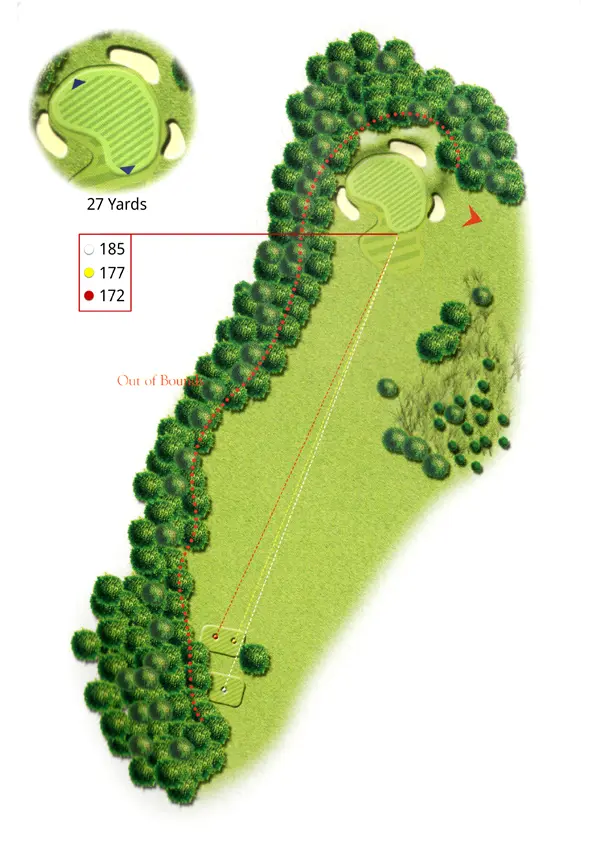
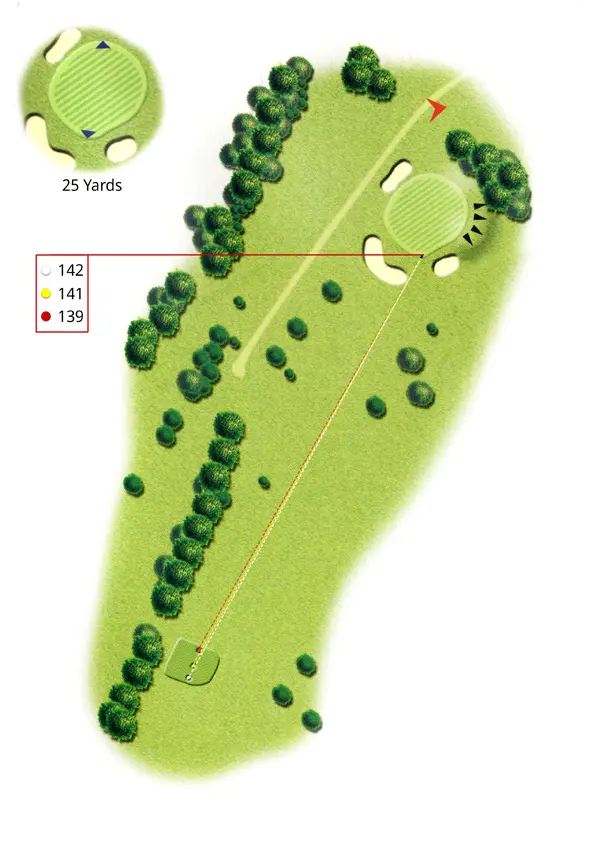
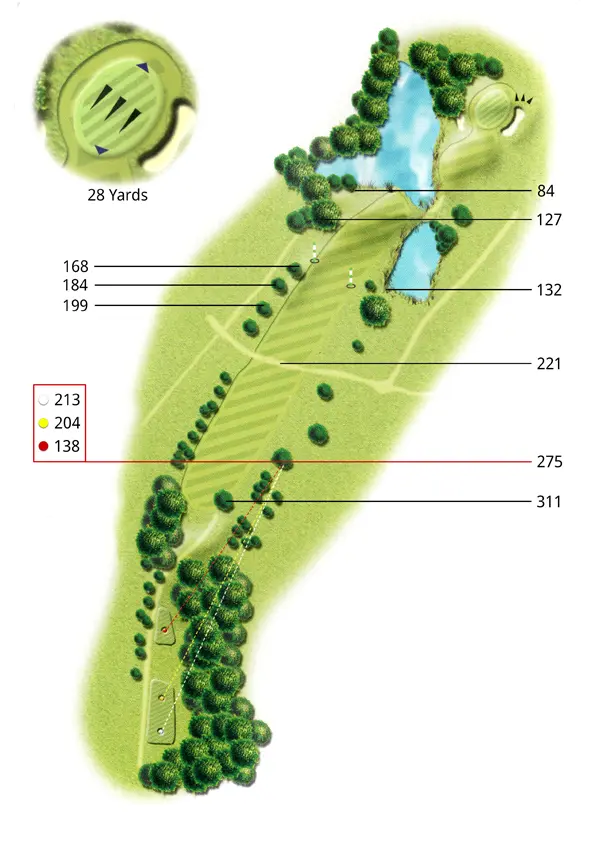
Named after the ideal target line for this tee shot, the Monument is visible on the left side of the fairway. Right is out of bounds so many choose to lay up short of the fairway bunker leaving a short iron approach to this tricky green with false front. Par is a great start to your round here.

Par Yards Stroke
  4 306 12
  4 302 12
  4 298 12
Hole 1 - Monument

From the back tee this is an intimidating tee shot with out of bounds and water on the right. Even from the forward tees they are often in play. Clent Hills are the picturesque backdrop for the approach shot to this narrow green which places a premium on accuracy.

Par Yards Stroke
  4 393 4
  4 361 4
  4 348 6
Hole 2 - Clent Hills

A deceptively tricky short hole. Especially when the breeze is up and the trees surrounding the tee and the green make club selection a difficult decision.

Par Yards Stroke
  3 131 18
  3 127 18
  3 123 17
Hole 3 - Badgers

The longest par 4 on the front 9. A generous fairway invites a well struck tee shot to the corner of this slight dog leg from left to right. The green is well guarded both left and right by large bunkers.

Par Yards Stroke
  4 450 2
  4 444 2
  5 421 7
Hole 4 - The Warren

This short par 4 will often tempt a tee shot that takes on the dogleg. Reachable by some for sure but be careful as a misplaced tee shot will leave you a difficult angle to this small and tilting green. A layup to the top of the fairway leaving a longer approach on a better line will just as likely produce birdie opportunities.

Par Yards Stroke
  4 316 14
  4 299 14
  4 286 13
Hole 5 - Foxes

Precise carry and ability to 'stop' the ball is required to hit this green in regulation. Bail out to the right and par could be rescued. Too much club and go long and the hazard at the back of the green and its drop zone await.

Par Yards Stroke
  3 141 16
  3 136 16
  3 130 18
Hole 6 - Turnpike

Out of bounds is on the left for the first time on this hole. Confident aim and alignment is a must from the tee. A well played tee shot will open the green up for a good birdie opportunity.

Par Yards Stroke
  4 353 8
  4 346 8
  4 318 10
Hole 7 - Mile Oak

The front 9's only par 5 hole. This plays as a 3 shot hole for most. Water influences club selection from the tee and the narrow hazard on the approach makes the lay up a shot to think about too. The small green is designed to receive a short iron and makes birdie chances tricky to take on this excellent par 5.

Par Yards Stroke
  5 511 6
  5 495 6
  5 443 4
Hole 8 - Wychbury

Heading for the turn this dog leg requires a tee shot tight to the left side of the fairway for a line into the narrow green. Find the right side of the hole from the tee and a blind approach over trees and a bunker make a par a great score.

Par Yards Stroke
  4 366 10
  4 359 10
  4 352 2
Hole 9 - Club Corner

The back 9 has three consecutive tee shots with out of bounds on the left. The 10th requires an accurate drive into the fairway to create opportunity for control into the green that slopes away fast from front to back.

Par Yards Stroke
  4 408 5
  4 373 5
  4 339 8
Hole 10 - Wassell Dingle

A great chance for birdie on this downhill par 5. But... out of bounds on the left for most of the hole means both the tee shot and approach need to be accurately played. Down breeze an eagle is not that rare a bird here.

Par Yards Stroke
  5 504 13
  5 469 13
  5 454 9
Hole 11 - Garratt Coppice

A strong par 3 where the safe side is guarded by bunkers on the right while to miss left leads to out of bounds 3 off the tee. Pitch your tee shot in the just the right spot on the front corner and the green will feed the ball toward any pin cut on the middle or back left.

Par Yards Stroke
  3 199 9
  3 191 9
  3 186 11
Hole 12 - Beeches

A par 4 that plays a lot longer than its yardage. Uphill to the fairway with a blind tee shot. Followed by another uphill approach to a well guarded green that is often back into the breeze.

Par Yards Stroke
  4 428 3
  4 426 3
  4 350 3
Hole 13 - Lutley Plateau

One of the best views on the course awaits from the tee on this short downhill par 4. Many lay up short of the cross bunkers. If you can keep it online and carry 250 yards or more the green is just a pitch away.

Par Yards Stroke
  4 311 17
  4 309 17
  4 308 15
Hole 14 - Turner’s Hill

It's name serves as a warning if you don't play this long par 5 with care all the way. An uphill right to left tee shot is followed by an approach through a narrowing tree lined fairway. The small two tier green runs fast from front to back and the pin position can make the difference between 1, 2, 3 or more putts...

Par Yards Stroke
  5 557 1
  5 510 1
  5 472 1
Hole 15 - The Monster

A semi-blind tee shot to a fairway that cambers from left to right in the landing zone makes club selection from the tee crucial. Play the right shot and a mid to short iron approach to a green that also slopes left right can be controlled. Miss the fairway left and an oak has to be manoeuvred around, miss it right and hope for a good lie in the rough.

Par Yards Stroke
  4 359 7
  4 350 7
  4 280 14
Hole 16 - Hagley Woods

A strong par 3 that often plays longer than it looks. The large bunker short of the green makes depth perception tricky. Definitely a hole where confidence in making your yardage to the middle of the green is a must.

Par Yards Stroke
  3 155 15
  3 154 15
  3 152 16
Hole 17 - Hawthorn

An exciting way to finish your round on the 18th's 'risk and reward' par 5. A well played tee shot that finishes close to the road leaves many considering the carry over the front water. Even after a lay up to the brow of the hill the Captain's Charity pond in front of the green accepts many donations!

Par Yards Stroke
  5 488 11
  5 479 11
  5 413 5
Hole 18 - Home